how to: blind hem stitch without a special foot

Last week I had to hem a pair of pants and I was so excited to use the blind hem stitch for the first time. I checked out a few online tutorials and everyone started out with the same thing: you’ll need a blind hem foot, switch to your blind hem presser foot, first you’ll need a blind hem foot that has a guide.

Huh? When the women demo’d the blind hem stitch to me on my machine, she did not use a different foot. So, I did a little bit of experimenting with some practice fabric. Here’s the hem.

blind hem without a blind hem foot

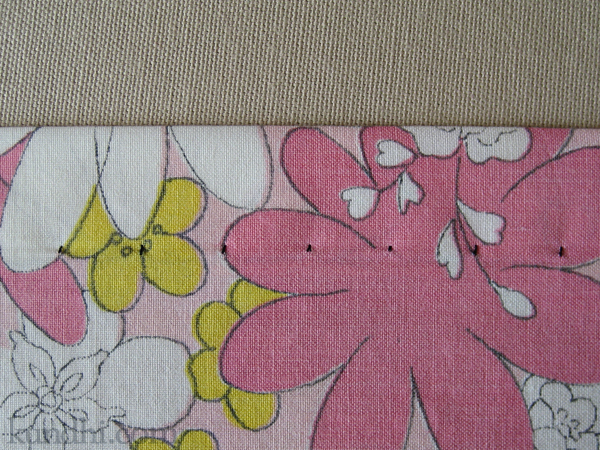
Here it is folded back. I pinned it in place.

blind hem without a blind hem foot

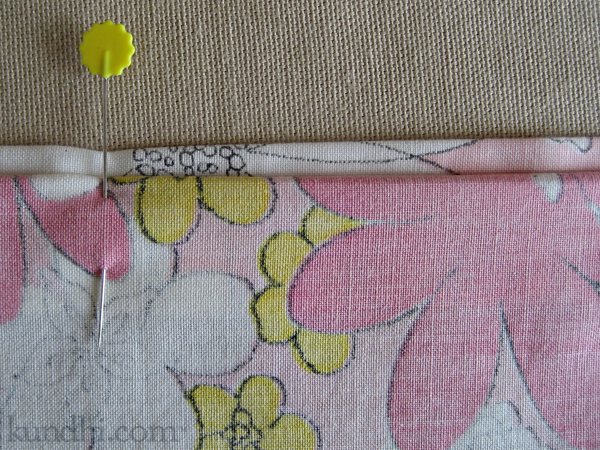
I did some practice stitches to figure out where the fold should be positioned for the best result. I used a magnetic seam guide to mark the best position. Painter’s tape would work just as well.

blind hem without a blind hem foot

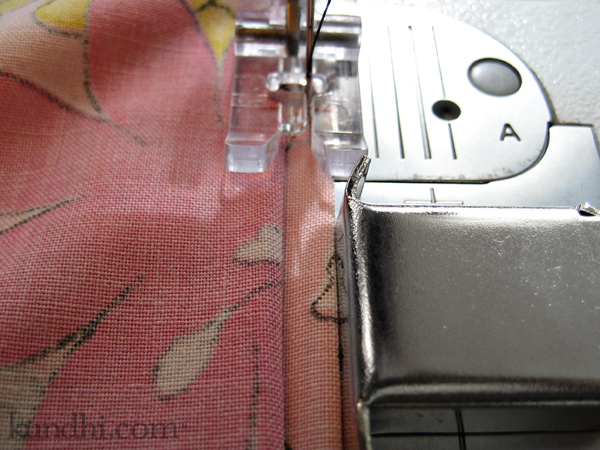
What you want is for the hem stitch to just barely catch the fabric…

blind hem without a blind hem foot

…so when you look at the right side, the stitches are small little dots. When you use matching thread, they’ll become practically invisible.

blind hem without a blind hem foot

And that’s it! No special foot needed. I took a picture of my guide position for future reference. You could write it in your manual or just leave the painter’s tape on your machine if you are going to do a lot of hemming.

resources: This video does a good job of showing how to fold your fabric before hemming. This is a great tutorial for hand-stitching a blind hem, which is a nice alternative if you are in the mood for a little bit of hand work.

my creative space

my creative space homemade yogurt scones

It’s picnic season and I’ve started thinking about snacks that are easy to pack when we’re going to the park. I’ve always loved scones, but I like them light and fluffy, not like some of the hard ones you find in coffee shops.

I’m also kind of picky about their nutritional value. I don’t like baking with a lot of heavy cream or butter. I was drawn to Alice Waters’ recipe because she doesn’t use butter. I’ve been replacing the heavy cream with different ratios of yogurt and milk.

The first batch I made tasted good out of the oven, but were kind of dry the next day. The second batch wasn’t that great at all. This third batch is awesome out of the oven. If they are just as good tomorrow, I’m declaring success!

diy hair elastic holders

diy hair elastic holders

If you have long hair, how do you store your hair ties? I used to keep them on the original cardboards, but they are kind of flimsy and tear easily. I wanted something more sturdy.

Using the plastic leftover from making my place mat sock blockers, I traced the original cardboards and came up with these.

diy hair elastic holders

We’ve been using them for awhile and they are holding up great. It’s really nice to pull them out the basket and not have the elastics fall off. You could use any kind of plastic that can be cut with scissors or even the thick chipboard from a legal notepad.

embarrassing: I went to link to my place mat sock holder post and can’t find it. Did I not share them on the blog? How is that possible? Here’s the tutorial I used. I’ll have to get a pic to share with you.

ignore your tomato plants and they’ll thrive?

farmers market tomato plant

Last year I may have tried too hard with my tomato and cucumber plants. I gave them tons of TLC and didn’t get much in return.

I got these little plants almost two weeks ago at the Farmers’ Market. I tucked them in the corner on the back porch during a severe thunderstorm and forgot about them for almost a week. Yikes!

But look at them! Still in their plastic container, I’ve got two teeny tiny tomatoes thriving under my neglect. I think I might be on to something here.

mmm… millet muffins

millet muffin heidi swanson

I’m not sure how I found Heidi Swanson’s website, but I’m so glad I did. I’ve been looking for fresh ways to prepare some of our pantry staples and she’s got so many interesting and different recipes. Avocado in something other than guacamole? Check. Yummy way to use up the millet your family won’t eat? Check. Summer red wine and sparkling lemonade recipe? Check!

Even before I checked her latest cookbook out of the library, I downloaded her recipe sampler. We made the muffins this afternoon and my daughter “loves the crunchy millet!”

I usually don’t read cookbooks through like a novel, but I haven’t been able to put this one down. It’s beautifully designed and the photos are lovely.

details: The muffins are from her second book: Super Natural Every Day. Her website is 101cookbooks.com. The recipe sampler is here.

my creative space

side zipper creative space

This space hasn’t been very creative in the past week. I’ve been sick since last Saturday. I’ve spent a lot of time sleeping and not much else.

Right before that I had made a trip to the thrift store and started work on some summer refashioning. I also drafted a skirt pattern from scratch and made this muslin. Notice what’s on the side? A zipper! I’m not sure why I’m so intimidated by these buggers, but I’m going to conquer that fear this summer. So long elastic waistbands!

pattern: I used the a-line skirt formula in Sew What! Skirts. Muslin fabric is a floral sheet.

More creative spaces here.

how to: personalize end-of-year teacher gifts
in 3 easy steps

tutorial fabric marker artwork on sewing gifts

Ok, so this really could be a how to: personalize any gift. It’s just that I really wanted to get my daughter involved with her teacher thank you gifts this year and this was all her idea.

She had been playing with a fabric gift card sleeve of mine and asked if we could make something similar for her teachers for “receipts and stuff.” She also wanted to decorate it herself.

You could do this with any fabric gift: zipper pouch, bookmark, you could even buy some blank canvas tote bags from the craft store. The important thing is to get your child involved!

Materials
In addition to your project supplies, you’ll need:
-disappearing ink pen
-fabric markers

Step 1
With your disappearing ink pen, mark off the area where your child can draw. It’s ok if she wants to draw outside of the lines, just make sure that the most important artwork is in the marked area.

Step 2
Let her go to town! When she’s finished, follow the directions on your fabric markers. Mine did not require heat to set the ink, but it did recommend two coats of ink. I traced over her lines after she went to bed.

Step 3
Sew up the gift!

tutorial fabric marker artwork on sewing gifts

What surprised me most about this project was how specific my daughter was for each drawing. Sueann received a picture of a treasure map (something she saw at school) with X marks the spot at a heart-shaped rock. Lorie received flowers (it was nature school—makes sense). Diane received a picture of “things falling” (not sure about that one—neither was Diane). They were all so different! She made sure I put a tag on each gift so it went to the correct teacher.

stash: I wish I thought to put a note about all of the recycled textiles that went into this gift. Nature school teachers are all about reusing. The fabric was thrifted and the zippers were recycled from other textiles. I wish I took a pic of the insides. She picked out different linings for each teacher, too!

my (not so) creative space

car cover mending

Severe weather is finally here in Nebraska and my creative space is filled with some not-so-creative sewing.

In the Spring, we stuff blankets under this cover to protect our car from hail. We got lazy last winter and left it on all year. The Nebraska winds nearly shredded it to pieces.

Now the weather radio alarm is going off and all we’ve got is a giant rag. I grabbed some canvas from my stash and started sewing patches. I gave up after fixing the biggest holes. It’s good enough to hold some blankets in place. That’s about it.

My husband asked if I could use the old cover as a pattern to sew a new one. Ha! I’ve taken on some crazy projects, but I think I’m going to pass on this one.

garage sale find: The canvas came in a tub with a bunch of muslin. I almost tossed it because it had spray paint stains on it. Now there’s hardly any left. I’ve made all sorts of heavy-duty patches with it.

Creative Spaces have a new home. Stop by and play along!

ikick freezer paper stencil

A few weeks ago, I mentioned that my first freezer paper stencil was a prototype. Now that the recipient has received his gift, I can show you: iKick!

kids karate freezer stencil tshirt

I used two coats of paint this time and got much better coverage, but it seeped under the freezer paper in some places. Not a big deal for this shirt because I like the edginess it brings to the design. I wonder if I could get better coverage with a smoother edge by using fabric markers instead of paint. Hmm…

stencil art: Karate guy from clip art I had on my computer. Font is Myriad.

Did you happen to catch Apple in the headlines today? It bumped Google out of first for most valuable brand.

mother’s tea

kids handmade mothers day gift

Last week, my daughter’s nature school class hosted a Mother’s Tea. It was a really sweet morning. The kids sang us a song, gave us presents they had been working on for a few weeks and then we all went on a hike to the Butterfly Garden to plant flowers.

preschool butterfly garden

If you are local and happen to be at the park, you should check out the garden. All of the flowers are planted by the preschoolers. They were so proud.

butterfly sculpture

The benches, sculpture and garden itself were donated by preschool parents over the past few years in memory of some of the mothers, teachers and children related to the program. It was a very touching morning.

handmade gift idea: The bracelets were so cute. They are beads on pipe cleaners chenille sticks. The poem was written by one of the teachers. The kids re-used old greeting cards to make new Mother’s Day cards. It’s a great project for little ones to do mostly on their own.