a clean slate: burlap inspiration board

faux coffee bean bag sack wall bulletin board

I am fascinated with all of the beautiful projects crafty people are making with coffee bean sacks. I’ve been meaning to make a covered bulletin board like this one for a long time. I just never got my act together and actually got the sack.

Then I found this great piece of burlap and decided I just had to get it up. There was no sewing involved. I used 3M removable hooks instead of putting holes in the wall. The grommets were from my stash. The whole thing took less than an hour from start to finish.

Now I just need to start filling it with inspiration!

my creative space

my creative space

In my creative space today, I’m helping my daughter with a few seed projects. She found this book in the cupboard a few weeks ago and has been studying it for foods that we have in our kitchen. So far she’s collected seeds from an apple and a lemon. I’ve given her a few avocado seeds, but they have all dried out before we had a chance to get our sphagnum moss. (She took them to nature school show-n-tell, instead.)

Now that we’ve got our moss, she keeps asking me when I’m going to eat That Avocado in the Refrigerator and could I please remove the seed gently with a spoon? Wish us luck!

stash: I won this book from a giveaway by the publisher on Facebook. It hangs out with my stash of cookbooks, although I have a feeling it might be moving to her bookshelves in the future.

What’s in your creative space today? Visit Kirsty’s blog to play along.

tea towel apron

tea towel apron

This tea towel was spared from the coffee experiment. I’ve been planning to turn it into an apron ever since I saw the project in Amy Karol’s first book. I love how it turned out, especially the pleats. I can’t wait to make more! Here’s a view of the tie.

tea towel apron

project details: This towel was part of a wedding gift. I’m so glad to give it a new life in the kitchen. Tie was in my stash from who knows where. Pattern from Bend-the-Rules Sewing.

coffee update: I took Happy Cat’s advice and re-brewed the grounds after my coffee yesterday. The towels have been soaking for over 24 hours and are still blue. I think they are made of kevlar.

thrifty find: new buffet!

thrifty find

It may have been a dresser in its past life, but I’ve got a new buffet, baby!

We’ve been looking for some kind of additional storage in our kitchen/dining area for months. I found this one at the thrift store this morning. It’s a little rough around the edges, but I think a coat of dark brown paint and new brushed nickel knobs will make it perfect.

The measurements for our space are also ideal. And it’s wood! Not particle board! It’s just right in so many ways. What a great start to the weekend!

Hope you have a great weekend, too!

p.s. The dishtowels from yesterday are still blue. Boo.

got a project brewing, literally

dyeing fabric with coffee grinds

I love these tea towels. They matched the kitchen in my old house. They’re super soft. They are the best tea towel fabric ever. They’ve even been burned a few times, which explains the holes here and there. But I love them and I had this crazy idea to make them work in my current kitchen. I’d trim off the holes and dye them brown. Even crazier, I’d dye them with coffee.

Tutorials online say you should use fresh brewed coffee. That just seems like a waste of perfectly good coffee to me. Coffee is for waking up, jump starting your afternoon and finishing off a fancy meal. It is not for dyeing fabric.

So I used coffee grinds. And they are still soaking. And they are still blue. I’m going to let them sit overnight. I’ll keep you posted.

my creative space

toy organizing bags

I’ve been trying to regain some control over my daughter’s closet. Lately she just wants to empty everything onto the floor to build a giant mountain of toys. Getting her to put away the toy mountain when she is finished has given me quite a few gray hairs.

In my creative space today, I’ve been making some bags for all of those Christmas presents that came without containers. I really should have done it sooner. Having a specific place to put things has helped a little. I also moved half of her toys to the very top shelf. That has helped a lot.

What’s in your creative space today? Play along over at Kirsty’s place.

fused plastic grocery bag lunch bowl

fused plastic grocery bag lunch bowl

So here’s the plastic bag project that feels like it’s been taking forever to finish. Some history on the idea: my husband has started taking salads to work. He throws everything into a plastic zipper bag* for easy transport, but said it’s not very easy to eat out of the bag.

fused plastic grocery bag lunch bowl

I thought some kind of bowl would help. Something stiff enough to stand up straight, but forgiving enough to be smooshed in a lunch bag. With this one, you just drop the zipper bag in and fold the edges over the bowl. It’s kind of deep, but salad greens take up a lot of room. I have a feeling I might need to adjust it after he tries it out.

fused plastic grocery bag lunch bowl

Some interesting things I learned while playing around with this project:

  • Target uses different kinds of plastic for their bags. They may look the same, but they don’t melt the same.
  • Parchment paper works much better than regular paper.
  • Measure twice, sew once. Ripping out stitches leaves holes!
  • I need some more project ideas to use up the leftover fused plastic.

stash: All of these bags came from my pantry. No matter how hard I try to bring my reusable grocery bags to the store, forgetting them on just one trip leaves me with a bunch of plastic bags in my pantry. I usually just recycle them, but this was kind of fun. I might keep on fusing them.

*Still trying to figure out how live without some plastic bags. We wash and reuse our plastic zipper bags until they practically fall apart. I wonder how they would fuse together. Hmmm…

new (to me) tablecloth

tablecloth refashion

I’m starting with an after picture so you’ll see the pretty new tablecloth first. I’m a little bit embarrassed posting the before picture, but I guess when you publicly make a commitment to finishing up some long overdue projects, that’s what happens. In my defense, the chair at the end of the table usually covers up the orange tablecloth. Here it is:

tablecloth refashion

Some history: a few years ago we ordered a table base online and had a local guy make the top for us. Our plan was to stain it the same color as our cabinets. The stain gives me a headache, so it needs to be done outside. There aren’t a lot of good days for that with Nebraska’s cold winters and windy summers. I bought the red striped tablecloth to help protect the unfinished wood.

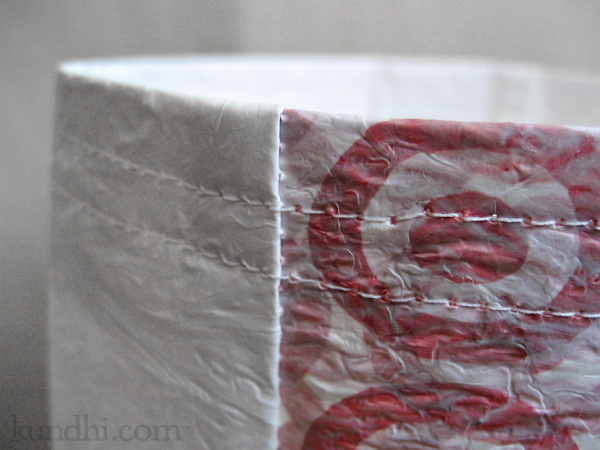
Then my daughter got to the drinking-milk-out-of-a-cup stage, followed by spilling-milk-on-the-table stage and I needed something to protect the wood better. The vinyl tablecloth I found was too big, but it matched our decor. It’s nice for messy group projects, like carving pumpkins or birthday parties. I figured I’d wait to hem it until I found a more permanent tablecloth.

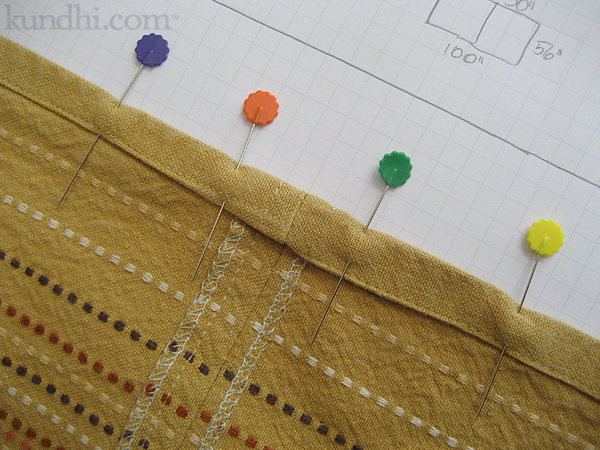
Fast forward to last week: I finally found the perfect tablecloth. Unfortunately it was too small, but fortunately there were two! I cut off the extra, serged the ends and unpicked the hems for a “seamless” seam.

tablecloth refashion

The extra fabric will become matching pillow cushion covers for the adjoining room. And the vinyl tablecloth finally got hemmed! I’m not sure what I’m going to do with the extra vinyl fabric. Any suggestions?

thrifted: original tablecloth was on clearance at Target, but all of the others are from local thrift stores.